
How to Determine the Holding Entry: The 70°/110° Needle-Tail Method

Tobias Maihoff
September 7, 2026
When ATC assigns a hold, you have to get into the pattern from wherever you happen to be. Two rule sets tell you how, and they agree: the FAA, the US civil aviation authority, in its Aeronautical Information Manual (the AIM), and ICAO, whose standards most of the rest of the world builds on, in Doc 8168. Both publish the same three recommended entries, direct, parallel and offset, and the one real difference is the name of the third: ICAO calls it the offset entry, the AIM calls the manoeuvre a teardrop. Which entry applies depends on the side from which you approach the fix. Holding airspace is designed around aircraft that fly those recommended entries at or below the published speeds, so a correct entry is what keeps you inside the airspace the designer protected.
Students lose a lot of time on this. Not because the rule is hard, but because they try to picture the whole pattern in their head while also flying the aircraft. The method below replaces the mental picture with one look at the HSI.
This article follows the same eight steps as the holding entry tutorial inside IFR Flight Simulator, with the same example situations, so what you read here is what you will see in the app.
The three entries
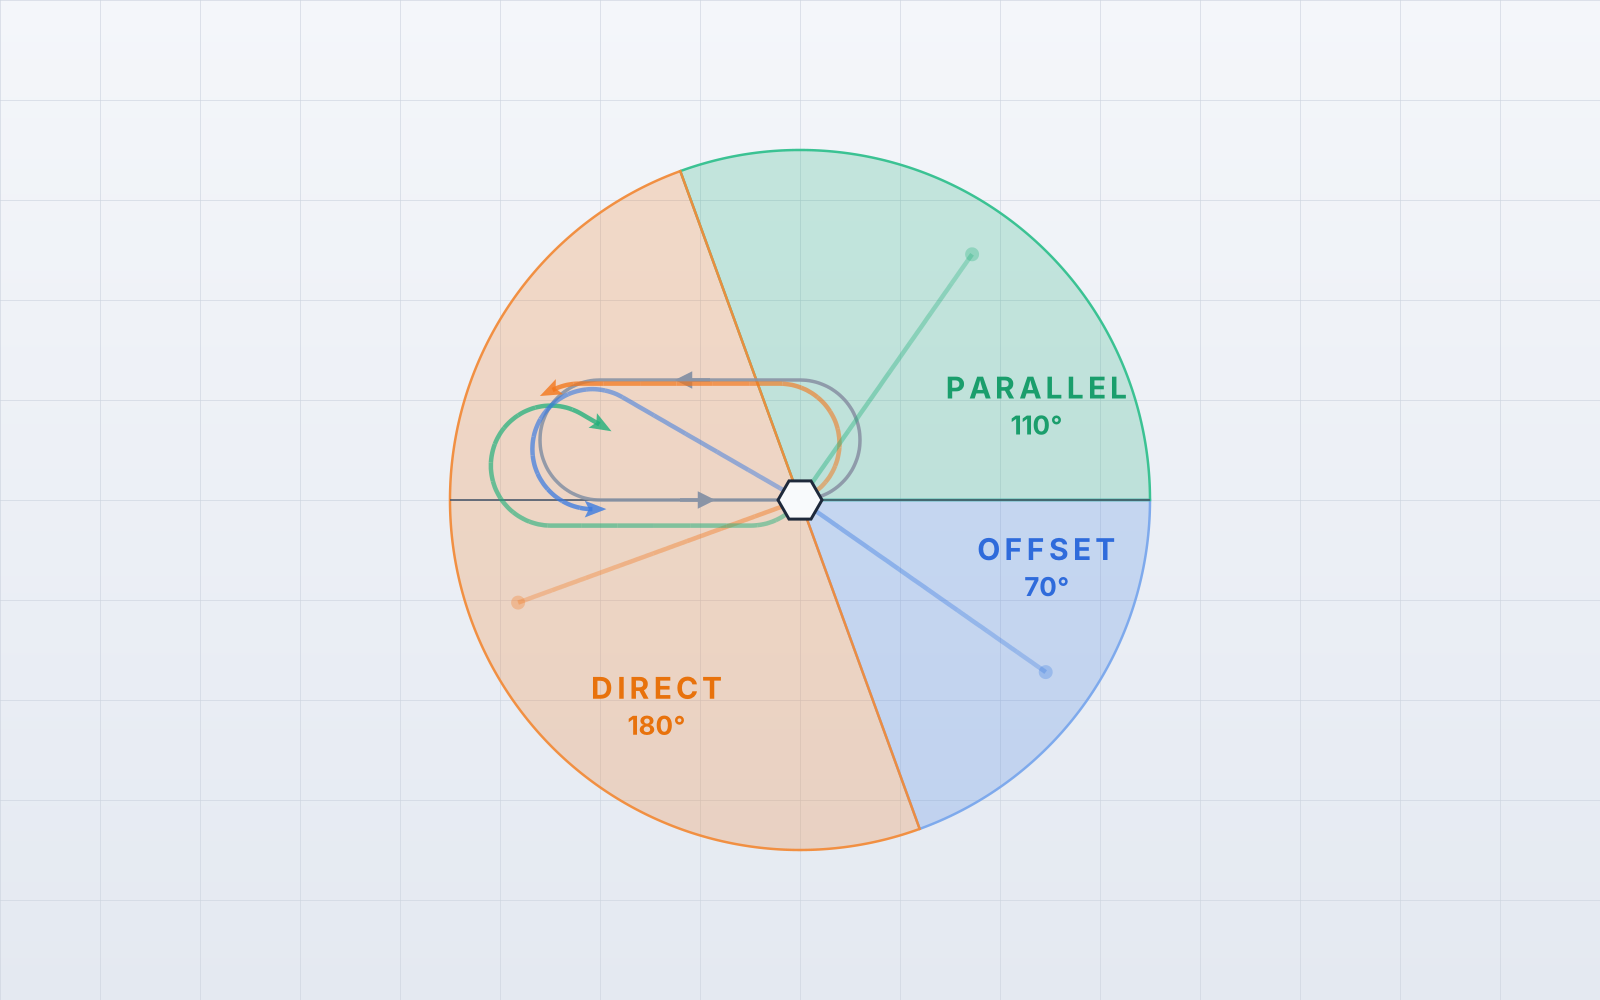
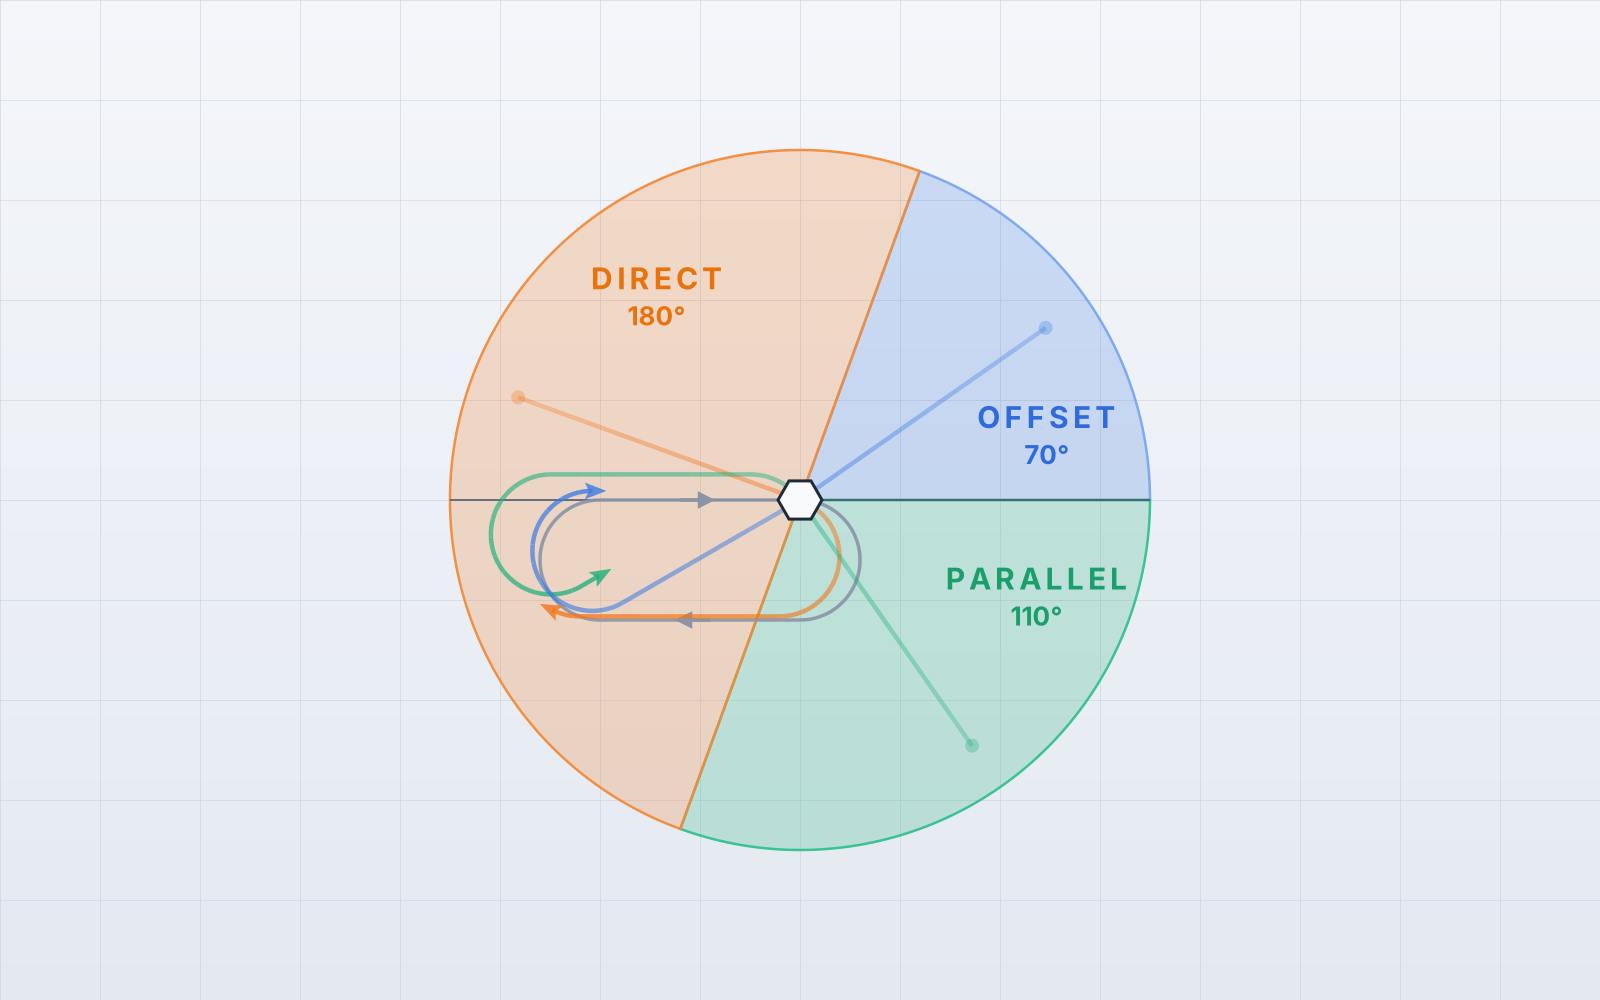 Standard right turns, inbound course 090°. Offset 70°, parallel 110°, direct 180°, each entry flown from the middle of its sector.
Direct entry. If you approach the fix from the direct-entry side, cross the fix and turn in the holding direction to join the outbound leg. This is the most straightforward entry and needs no special manoeuvre.
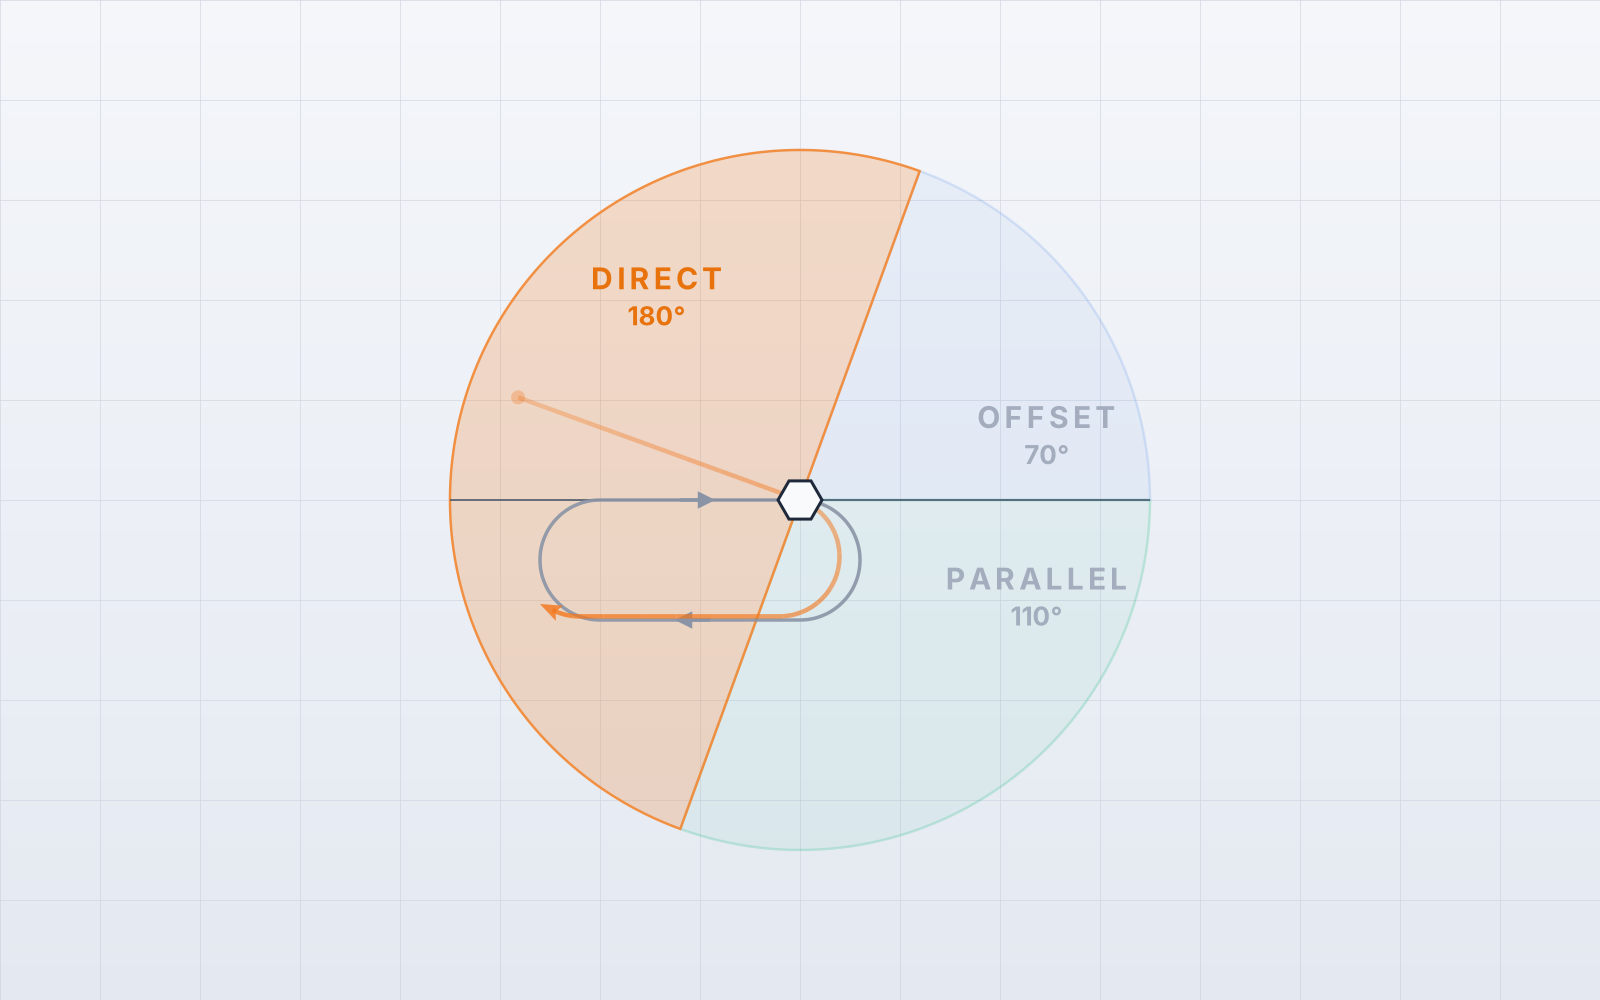 Direct entry, flown from the middle of the direct sector.
Parallel entry. When you approach from the parallel sector, fly to the fix, then turn to a heading that parallels the holding course outbound on the non-holding side. Hold that heading for about one minute. Then turn back through more than 180° and return to the fix or intercept the holding course inbound. That rejoin turn is made toward the holding side, which means it is the opposite of the pattern's own turns: in a standard right-turn hold it is a left turn, in a left-turn hold a right turn. The full sequence for a standard hold is first left onto the parallel leg, then left again to rejoin, then right onto the inbound course at the fix.
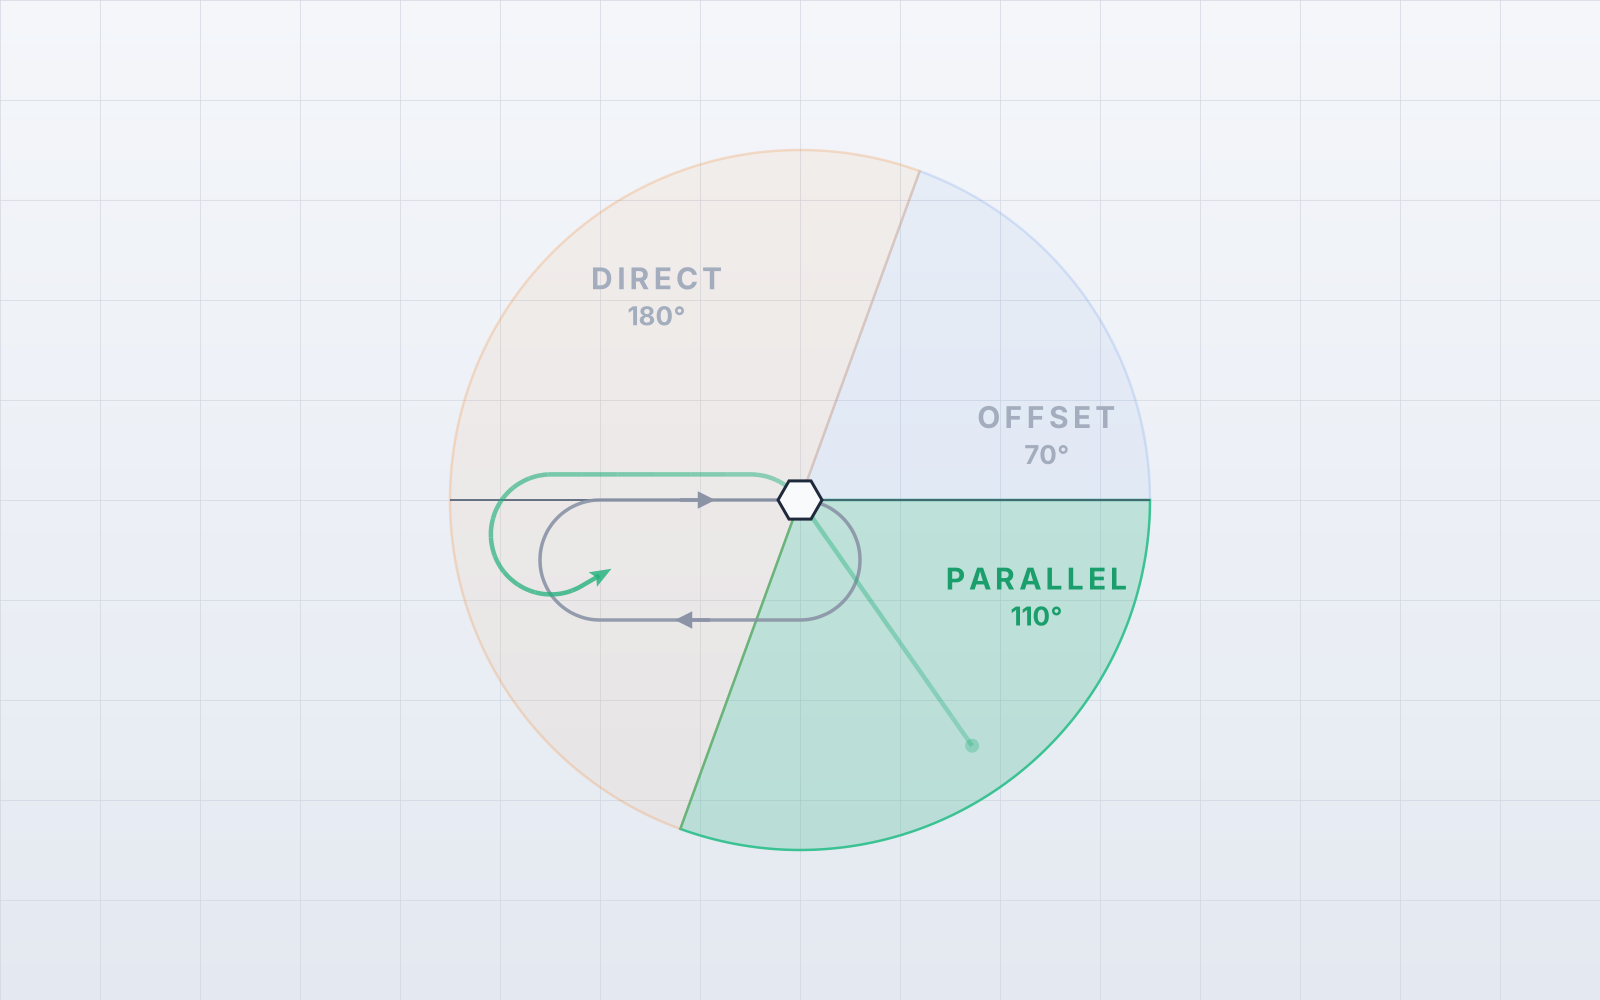 Parallel entry, flown from the middle of the parallel sector.
Offset entry / teardrop entry. When you approach from the offset sector, fly to the fix, then turn to a heading 30° from the outbound course toward the holding side. Hold it for about one minute, then turn in the holding direction to intercept the inbound course. The manoeuvre goes by two names; the note below says which book uses which.
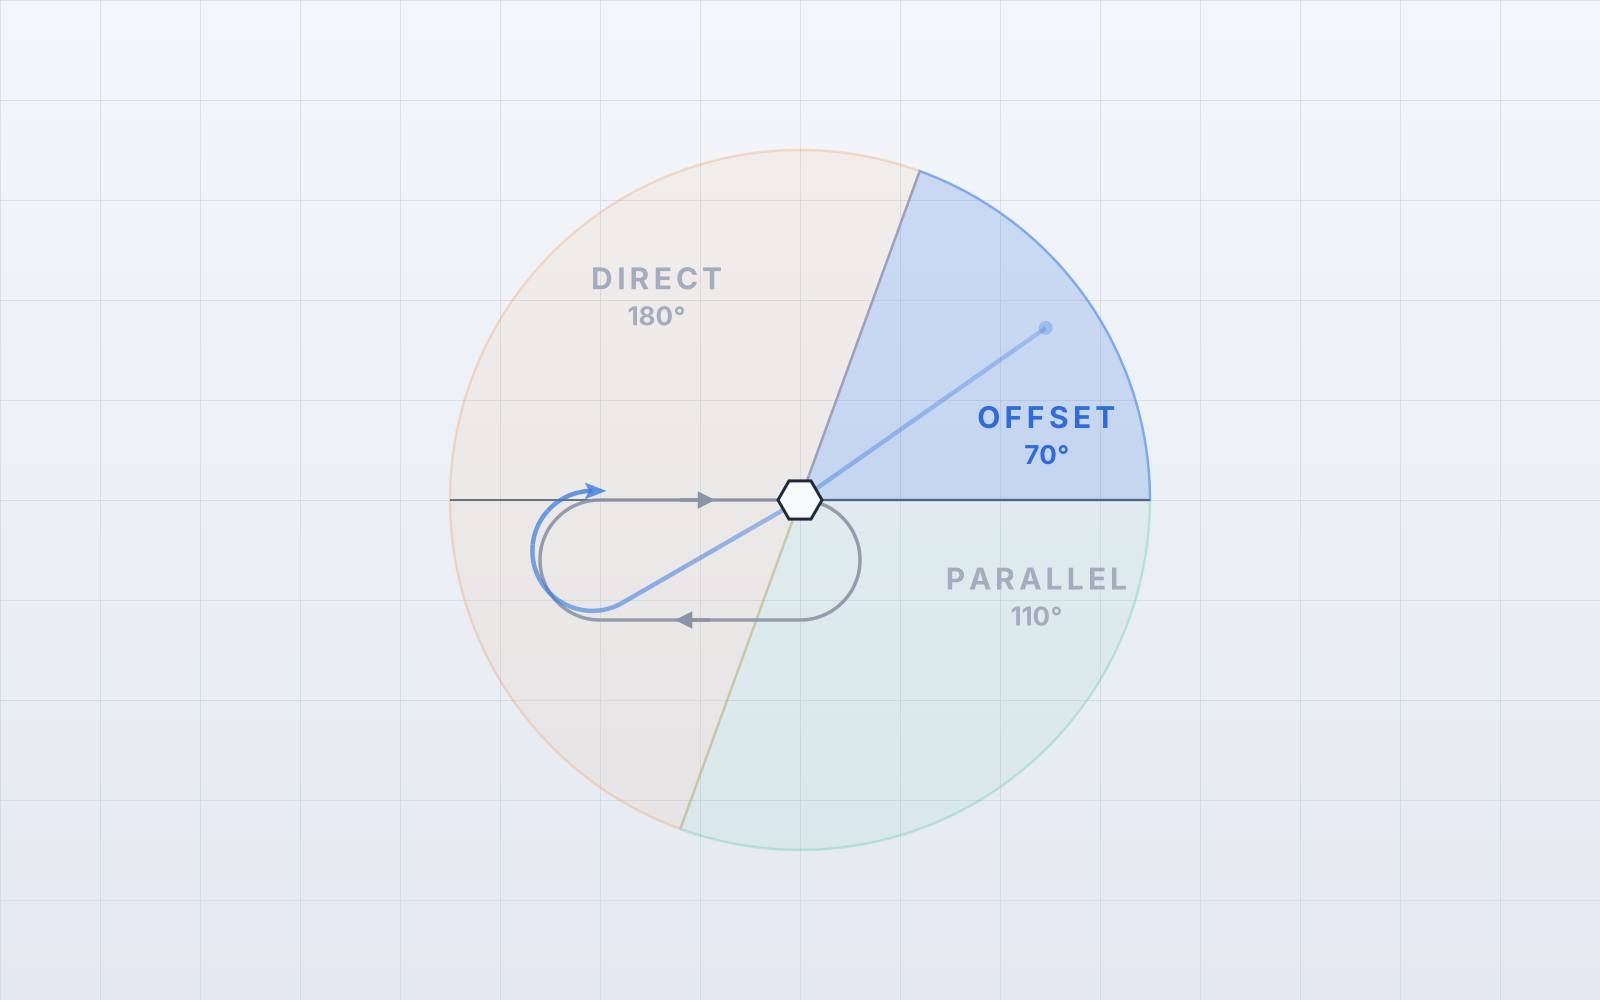 Offset (teardrop) entry, flown from the middle of the offset sector.
Each entry belongs to a sector around the fix. The question is always the same: which sector am I in? Which entry do I need to fly?
Offset or teardrop?
One manoeuvre, two names, depending on which book you learned from. ICAO Doc 8168 names the sector and the procedure offset. The FAA's AIM calls the same manoeuvre the teardrop procedure, after the shape the track draws around the fix, and names the sector after it. Instructors and examiners use both, often in the same briefing, so it is worth recognising either.
The 70°/110° rule
Picture the fix with the inbound course drawn through it. Two lines divide the space around the fix into three sectors:
- For right turns, the offset sector runs from the inbound course to 70° on one side, the parallel sector from the inbound course to 110° on the other side, and the remaining 180° is direct.
- For left turns, offset and parallel swap sides.
 Left turns, inbound course 090°. Offset and parallel have swapped sides compared with the diagram above.
Worth remembering: the offset sector is 70° wide and the parallel sector is 110°.
The needle-tail method
Here is the trick that makes this usable in the cockpit:
Fly toward the fix. Set the course selector to the inbound course and look where the needle tail points. Divide your compass rose into the three entry sectors. The sector that contains the tail is your entry.
The sectors on the ND, flying toward the fix with the bearing pointer straight ahead. With the course needle on the inbound course, the tail tells you the entry: 12 o'clock to 70° right is offset, 12 o'clock to 110° left is parallel, the rest direct. That is for right turns; left turns mirror it.
Why does it work? The course needle lies along the selected course, so its tail points back along the reciprocal, and the sectors are defined around that same inbound course.
That is the right reading, and it is worth being precise about why: the sectors are defined against heading, not against bearing or track. AIM 5-3-8 says to determine the entry turn from aircraft heading upon arrival at the holding fix. ICAO's Doc 8168 (PANS-OPS), the international rulebook that most non-US procedures are built on, says the entry shall be according to heading in relation to the three entry sectors (Volume I, Part II, Section 6, Chapter 2, 2.2.2). The needle tail gives you that comparison directly.
The one thing to watch is when you take the reading. What decides the entry is the heading you have when you arrive at the fix, not the heading you happen to be on some miles out. If you are being vectored, or still turning onto the course, or about to roll out on a different heading in a strong wind, read the tail again once you are on the heading you will actually cross the fix with. A bearing pointer (RMI or ADF needle) does not answer this question. It shows your bearing to the station, and bearing is not the variable the entry sectors are defined against.
Where the sectors sit for right and left turns
In heading-up terms, for right turns: from 12 o'clock to 70° right of the nose is the offset sector, from 12 o'clock to 110° left is parallel, and everything else is direct. For left turns, swap the two.
The offset sector is always the narrow one on the side the pattern turns to, and the parallel sector the wide one on the other side. The instrument above shows a standard right-turn hold; a left-turn hold mirrors it.
Left turns, inbound course 090°. The same instrument as above with the sectors mirrored: offset 70° left of the nose, parallel 110° right.
Three examples, all with inbound course 090° and right turns, exactly as you would practise them in the app:
Before the instruments, here is the same hold from above, so you can put each one next to the side of the fix it is flown from.
 The same hold from above, inbound course 090°, right turns. Each instrument below is one arrival into this picture, seen from the cockpit.
Direct. Heading 070 at the fix, course selector on 090. The tail sits just left of 6 o'clock, deep in the direct sector. Fly to the fix and turn right onto the outbound leg.
Direct entry. Heading 070, inbound course 090°. The tail is in the direct sector and the app draws the entry that follows.
Parallel. Heading 330 at the fix. The tail is 60° left of the nose, inside the 110° parallel sector. Fly to the fix, turn left to 270 to parallel the holding course outbound on the non-holding side, one minute, then turn left again, back toward the holding side, through more than 180° to the fix or onto 090 inbound.
Parallel entry. Heading 330, inbound course 090°. Outbound on 270, then back through more than 180° to the inbound course.
Offset. Heading 210 at the fix. The tail is 60° right of the nose, inside the 70° offset sector. Fly to the fix, turn to 240, one minute, then turn right onto the inbound course.
Offset entry. Heading 210, inbound course 090°. Out on 240, then right onto the inbound course.
All three are standard right-turn holds. With left turns the sectors swap sides, so the same tail position that reads offset here would be a parallel entry, and the other way round.
Step-by-step example
ATC: "Hold southeast of LIBBY on the 135 radial, expect further clearance in 15 minutes." You are flying toward LIBBY on a heading of 090.
What you have in front of you at LIBBY: heading 090, course selector on 315, the needle tail up to the right.
- Find the inbound course. Holding on the 135 radial means the inbound course is the reciprocal: 315.
- Set the course selector to 315.
- Look at the tail. The needle points to 315 on the card. Its tail points to 135. With your heading of 090 at the top of the card, 135 is 45° right of the nose.
- Read the sector. No turn direction was given, so it is a standard right-turn hold. 45° right of the nose is inside the offset sector, which runs from 12 o'clock to 70° right.
- Fly the offset entry. Cross LIBBY, turn to 105 (the outbound course 135 minus 30°, toward the holding side), one minute, then turn right to intercept 315 inbound.
The same picture with the sectors on it. The tail sits 45° right of the nose, inside the offset sector, and the offset entry that follows is drawn from the fix.
If the hold had been assigned with left turns, the same tail position would fall in the parallel sector, and you would fly a parallel entry instead. Same needle, mirrored rule.
Common mistakes
Setting the outbound course. The course selector goes on the inbound course, the direction you fly toward the fix. On a radial hold the inbound course is the reciprocal of the radial.
Forgetting to mirror for left turns. With non-standard turns, offset and parallel swap sides. If you always apply the right-turn picture, you will pick the wrong entry roughly half the time in left-turn holds.
Overthinking boundary cases. Close to a sector line either neighbour satisfies the rule, so pick one, brief it, and fly it accurately. The two entries do not put you in the same place, though: the sector boundary article draws both of them from each line, flown by the definition with the app's own path generator. Both standards leave room at the boundary, in different words, and it is worth keeping the two apart. ICAO writes the allowance into the entry rule itself: Doc 8168 (II-6-2, 2.2.2) has the entry made according to heading in relation to the three sectors, recognising a zone of flexibility of 5° on either side of the sector boundaries. The FAA does not draw a zone on the sectors, but AIM 5-3-8 gives an equivalent allowance on the reading: ±5° in heading is considered to be within allowable good operating limits for determining entry.
Solving the entry and forgetting the wind. The entry gets you into the pattern; the wind correction keeps you in it. Across 2,302 graded holding attempts in IFR Flight Simulator, 122 attempts (5.3%) flew the wrong entry, while 731 attempts (32%) were flagged for outbound heading. Of those outbound-heading attempts, 76% had applied less wind correction than the situation called for, so the outbound leg, not the entry, is where most of the corrective work sits.
Do you still need this with an FMS?
A modern flight deck does most of this for you. Load the hold into the FMS or the GPS, and the box works out the entry, draws it on the map and flies it on the autopilot. So why learn the rule at all?
Because instrument training is not built around the box. On an IFR checkride you are expected to determine the entry yourself, out loud, while flying the aircraft, talking to ATC and setting up for the hold, often from a clearance you heard once. That is the point of the exercise: the hold is a compact test of multitasking, of thinking and calculating under time pressure, and examiners use it exactly for that. The rule is short enough to apply in the few seconds you have and robust enough to survive the workload.
It also keeps you honest when the automation is doing the work. If you know what the entry should be, you notice when the magenta line proposes something else, when the hold went into the box on the wrong side, or when you are hand-flying raw data because a box failed. Automation changes who flies the entry. It does not change whether you need to know which one is right.
Practice until it is automatic
The method is simple to read and easy to forget under workload. The only fix is repetition: read a clearance, set the course, look at the tail, say the entry. Then fly it.
 A holding entry flown in IFR Flight Simulator: course selector, needle tail, then the pattern with live instruments.
IFR Flight Simulator generates random holds at real fixes worldwide, with right and left turns, shows you the sectors on the HSI or the glass ND, and then lets you fly the entry and grades it. It also animates the optimal flight path for the entry with a live needle overlay, so you connect what the needles do on the instrument with what the aircraft does on the chart. Dozens of entries fit in the time one hold takes in a full simulator.
Quick reference
| Turn direction | Offset (teardrop) | Parallel | Direct |
|---|---|---|---|
| Right (standard) | 12 o'clock to 70° right | 12 o'clock to 110° left | Remainder |
| Left (non-standard) | 12 o'clock to 70° left | 12 o'clock to 110° right | Remainder |
Fly toward the fix. Course selector on the inbound course. Find the tail. Read the sector. Fly the entry.
Sources
- FAA AIM 5-3-8, Holding. Online AIM, Basic with Changes 1, 2 and 3, effective 9 July 2026.
- ICAO Doc 8168, PANS-OPS, Volume I, Part II, Section 6, Chapter 2 (hold entry). Sixth Edition, 2018.
Standards checked: September 2026. Both documents change; check the current version before relying on a detail here.

Tobias Maihoff
September 7, 2026